Updated January 2006
Warning: Read the instructions completely and understand fully before proceeding. This procedure will cause you to loose all internal patches that you may have modified, and your song sequences. Back up your patches to external cart, tape deck, or computer via midi, and/or your sequences to tape or computer via midi. If you don't know how, or cannot interface to your computer but have a working PC with a sound card, try taking the tape out from the ESQ1 and connect to the "record in" on the sound card and record your patches into a wave file, 16 bit, 44.1k .wav format. When saved, verify that the waveform is clean and close to maximum amplitude. Make any adjustments to the record console in Windows to accomplish this. After replacing the battery, play the waveform into the ESQ1 play input following the procedure described in the operation manual under "Tape load and save" procedures. For further detailed instructions, check out Alternate Method.
Warning: When working inside the ESQ1 keyboard, make sure you ground yourself to the chassis to prevent any unwanted static discharge that will damage some of the integrated circuits and render your keyboard useless.
If not done so, study the FAQ page.
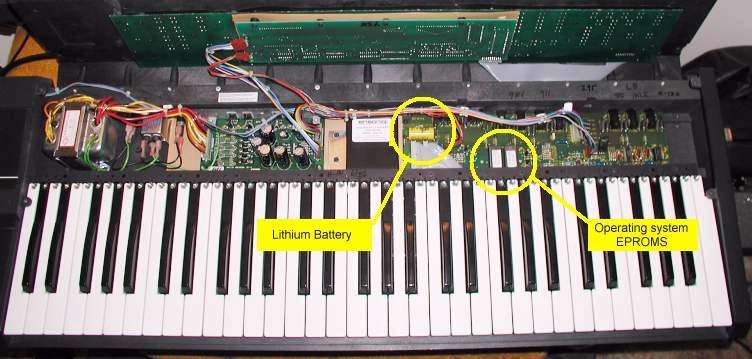
Note: The main board pictures shown may not look exactly like your model but similar. I will be placing other variations of the main board as soon as I can.
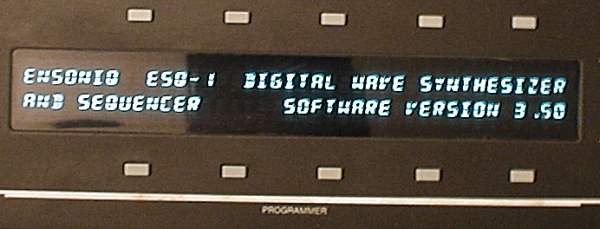
The latest (last) version on the operating system in the Ensoniq ESQ1 is Version 3.5. If you desire to upgrade your ESQ1 to this version, the OS EPROMS must be replaced. There are two memory chips that contain the operating system code. They are 27256 or 27C256 ultraviolet erasable devices. This can be accomplished by taking your ESQ1 to an authorized service repair center or replace them yourself. Since this unit has been obsolete for a number of years, you may not find a qualified dealer to perform the upgrade. If you are not technically inclined, you should find someone capable to do the job.
To replace them you must unplug all cables from the keyboard, remove four Allen head screws on the top, carefully remove the old chips, and re-install the new chips. You must be careful because static electricity could damage your ESQ1. Touch the chassis or the ground shield before touching any electronic components. Before doing so, you must note which chip goes into which socket. Also make sure they are plugged in the right direction.
Once this is done, you must close up the top cover, apply power, and do a software reset. If everything is correct, you will first see the version number appear on the lower right of the display.
The EPROMS are located in the right circle.
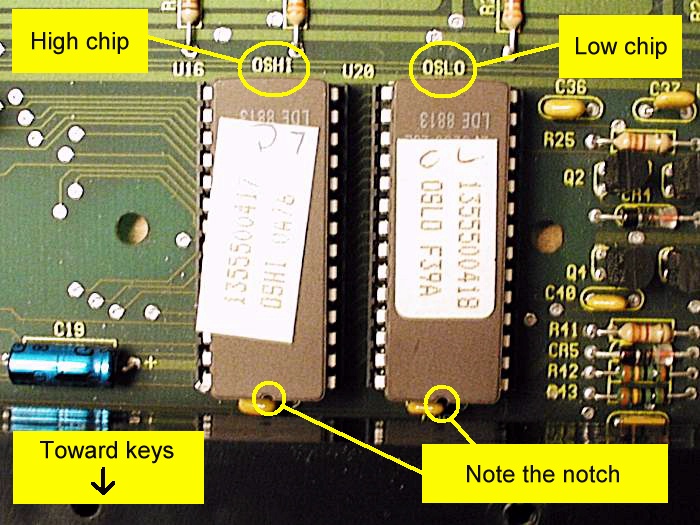
Position and direction of the placement of EPROMS is critical.
Care must be taken when removing and installing the EPROMS. You must carefully pry the chips out evenly so as not to bend the fragile pins. One end of the EPROMS are right next to the keyboard assembly and it is very difficult to pry the chips up from the notch side without damaging them. Extra care must be taken not to damage the chips! Some variations of the ESQ1 my have the EPROMS positioned just under the keyboard and you will have to remove the keyboard assembly. A right angled pick or a dental pick will allow you to lift the chips from both sides. A scribe or ice pick could be used to pry the chips out by lifting the chip from between the pins near the notched side. (See picture below of tools.) They should be immediately placed in a piece of aluminum foil or anti-static foam. The edge of the keyboard assembly may make removing and installing the chips a little difficult. It can be accomplished if done carefully. It is not necessary or advised to remove the keyboard assembly.
When inserting the new chips, make sure the pins are all straight and evenly spaced. Bending any pins will break them off. Observe the direction that the chips will be placed. The chip sockets may have a notch on them too, and they may be placed in the wrong direction. Ignore the socket notch. Pay attention to the picture above and make sure the notches on the ends of the chips face toward the front of the keyboard toward the keys. The low order chip must be placed in the low socket (right position) as shown in the above picture. Carefully align the chip pins in the socket. Make sure all pins are straight and true and aligned properly into each socket hole before pushing. Apply light pressure and even pressure and slowly push chip straight and level into the socket. Observe that no pin folds under the chip or sticks out of the socket. Do not "rock" the chip into the socket. If the pins seem to be spread out and one side doesn't fit into socket, hold the chip in your fingers and push one side against a flat surface (careful of static) to insure they are straight down (perpendicular to the flat of the chip). Do the same with the other side. This will help. Do not remove the label on the top of the chip this label covers a little quartz window and cannot be exposed to light or damage to the memory will result. If you have any uneasiness about this procedure, get someone that knows how and is more comfortable to do it.
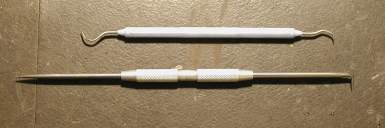
Tools that can be used to lift chips.
The lower one can be purchased at a hardware store or Sears.
Once you have closed up the cover, you must do a factory reset and possibly a filter tune.
To reset the system, turn power on, wait for the patches to display,

Hold the "record" and "soft button #1" at the same time. Answer yes to reset the keyboard.
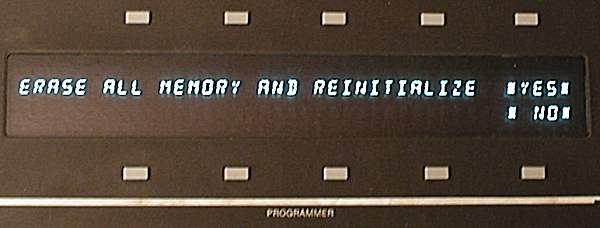
Your display should now say Version 3.5 when you power up.
Details of other hidden commands can be found here.
If you have an EPROM programmer (around US$200+) and an ultraviolet eraser (around US$50), you can download the software files from the web and load them into the EPROMS yourself. If you do not have the equipment and expertise, you can send me the files on a disk or CD, and your old EPROMS, and I will program them and return them to you. Copyright regulations prevent me from obtaining the software and EPROMS, programming them, and sending them to you. A bit convoluted but that's the way it has to be.
Location for EPROM software ESQ1 OS Version 3.5 (3/4 the way down the page on the left)
Email Rick with any questions about this procedure.