
Note: The information that follows is for educational purposes only and the author claims no responsibility for illegal use of this transceiver or these instructions.
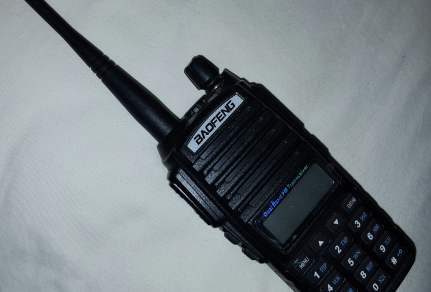
For the newcomer to radio communications the Baofeng UV-5R portable FM transceiver and similar models are a little hard to program. Right out of the box you can transmit and receive some factory channels that were programmed in for test purposes. Those channels are not in the Amateur Radio band and are illegal to transmit on. In order to use this transceiver legally you must "program" or store the frequencies you wish to receive and transmit. The UV-5R shown below is the most common model.
There are a number of variations of this transceiver and some of the instructions vary greatly. You can easily program your Baofeng using your personal computer and special free CHIRP software. Appropriate USB serial cable and software driver are required to use the CHIRP software and can be purchased here. Firmware upgrades appear in more recent purchases of the UV-5R and the CHIRP programming software must be updated too.
First the caveats. You must understand a few important things about this transceiver.
1) This transceiver is "primarily" sold as an Amateur Radio transceiver and you must have a valid FCC Amateur Radio license, at least a Technician Class license in order to transmit with this transceiver. You cannot legally transmit using this and radios like this on any other service even with a license for that specific service. i.e. GMRS, FRS, State or County emergency services or law enforcement, business class.
2) This transceiver can transmit and receive out of the licensed Amateur Radio bands without modifications. In the past it was illegal to sell a product in the U.S. that would transmit out of the Amateur Radio band without modification. This was called MARS capable or "Non US" use. (MARS frequencies are special channels reserved to be used by specially authorized licensed Amateurs to communicate with Military liaison to pass personal communication from civilian to military personnel and are just outside the US amateur radio bands.) This author doesn't know if this law was relaxed but highly doubts it. Update: During the summer of 2018 the F.C.C has clarified this ruling and has come down hard on distributors of the UV5 and its clones. As of September 30, 2019, The FCC is banning the import and sale of the Baofeng and all equivalent radios in the U.S. In other words, it can transmit on the public service "police and fire" bands ILLEGALLY. Even if you are a law enforcement officer or volunteer firefighter you CANNOT legally use this radio to talk to the dispatcher or other licensed public service units. Doing so or interfering with public services can bring fines and imprisonment. You can be tracked down in a matter of minutes if you attempt to transmit on those frequencies or interfere with licensed services. Also this transceiver is not "Type Accepted" by the F.C.C. for public service (police/fire/business band) operation. This transceiver can also transmit on the GMRS, FRS, and MURS assigned channels and this is also "ILLEGAL" even if you have an appropriate license.
| This transceiver cannot be legally used by your family or group to "stay in touch" on any frequency unless each member of the family or group is a licensed Amateur Radio operator with a valid callsign and only transmit within the Amateur Radio bands. |
This unit is not type accepted for any services other than the Amateur Radio band and in some cases it doesn't meet acceptance even for the Amateur Radio bands. Type acceptance is a certification that a radio manufacturer goes through with the F.C.C.'s approval to demonstrate frequency stability and accuracy, harmonics, and it costs the manufacturer a considerable amount of time and money and most manufacturers won't get this certificate and type acceptance. Type acceptance has many levels F.C.C. Parts 15, 95 and 97 to name a few, and just because it may be type accepted on one service doesn't mean it is type accepted for any other service. A type accepted radio will have a special number usually in the battery compartment or on the back of the radio. It may say, "FCC ID ##### or CMIIT ID #####." As of September 30, 2019 no radio can be imported and sold that is not type accepted or multiple type acceptance within the same unit.
3) This transceiver is capable without modification to transmit and receive on U.S. Government frequencies. Doing so can lead to severe penalties and imprisonment.
4) There is no law in using this transceiver to "receive" any frequency but to divulge certain information heard to a third party can be illegal.
5) Simply put, if you are not a licensed Amateur Radio operator you cannot transmit on ANY frequency this transceiver is capable of and licensed persons can only transmit within the Amateur Radio bands. You or your group can't just pick an unused frequency and use it unlicensed for you own communications. You could easily and unknowingly be on a highly monitored covert government channel.
6) However there is one carved out usage of this transceiver on any frequency and that is if it is a matter of life and death but even this exception can lead to costly legal battles and it specifically calls for a matter of eminent danger of death. Calling in a traffic accident isn't an exception. However for some reason the F.C.C. recently added "damage to property" which seems kind of strange. It is not clearly defined.
7) Also remember that an Amateur Radio license allows for personal use communications amongst other licensed Amateur Radio operators and not for broadcasting, doing business, or playing music. There are many other limitations and you should be familiar with all Amateur Radio rules and regulations.
8) A typical violation of these transceivers is its use on FRS. The Family Radio Service has specific restrictions for this service. It cannot have a detachable antenna or external jack on radio. It cannot use any battery other than the ones contained within the unit. No external power jack or source. It cannot exceed 0.5 watts output. It must be narrow band modulation (2.5 khz). All these restrictions are in violation if the Baofeng is used in the FRS band.
Obviously in a "doomsday scenario" things will be different but this author will not suggest or recommend any possible illegal use of this or any radio by unlicensed persons or out-of-band use.
This author recommends that if you do not have a valid F.C.C. Amateur Radio (ham) license you should earnestly study online courses and take the F.C.C. exam from a VE (Volunteer Examiner) which may be free or cost around $15 here in the U.S. Why get a license? So you can legally use this transceiver to transmit and also learn the proper communications etiquette. You will also learn the proper techniques, capabilities, message handling, and making a lot of new friends. Just listening and not participating until some disaster happens is not a reasonable answer. You must become proficient in the use of your radio and know its capabilities and limitations. Amateur Radio is a very popular hobby and can lead to better electronic knowledge and skills. Advancing to the General Class license will allow you to communicate with other hams all over the world with HF (high frequency) transceivers.
End disclaimer. Now the good news. So let's get down to business:
First you must know that the two bands that you can use are the 2 meter VHF (144 to 148 megahertz) band and the 70 cm UHF (420 to 450 megahertz) band. You must not transmit on the exact band edges because this is illegal. In other words you must not transmit on 148.000 mhz or 450.000 mhz because your signal and modulation overlaps the edge of the band. You must be at least one channel inside the band. There is a band plan which shows all the legal frequencies you can use for your specific class of license and mutual agreements recommended by the ARRL and among all amateurs to use certain frequencies for simplex (person to person) or duplex (person to repeater to person) and types of emissions (AM, FM, SSB, CW, TV, digital modes.
The UV-5R has a dual display. This leads to confusion so just use the upper display for programming and operation until you're more familiar with its operation. It has a memory (Channel) mode, and a VFO (Frequency) mode. In the memory mode you can have this transceiver programmed for up to 128 channels. In VFO mode you just use the keyboard to punch in the frequency and any other parameters you desire to receive and/or transmit.
| VFO stands for Variable Frequency Oscillator. It is a confusing term and shouldn't be used by radio manufacturers for this mode. It just means you can vary (change) the frequency manually by just punching in the frequency you desire to transmit and receive without affecting memory channels. |
Besides the frequencies for receive and transmit, you can program the CTCSS or DCS tones.
| CTCSS/DCS means Continuous Tone Coded Squelch System/Digital Coded System. This tone is a low frequency audio tone below the hearing range and is transmitted along with your voice. The receiving end detects this tone and opens the squelch to pass your voice. These tones are sub-audible between 67 and 250 hz (cycles) and are used to open the squelch on your receiver or repeater access. These tones prevent unwanted noise or interference from being received in your radio. The DCS mode is not often used except for business and police communications or places where repeaters are densely populated and interference is greater. Note: Some refer to the CTCSS and DCS as PL or DPL which is Motorola's trademark for Private Line or Digital Private Line. GE refers CTCSS as CG for Channel Guard. |
When programming repeater channels you must offset the transmitter frequency from the receive frequency. In other words you transmit on a frequency other than your receive frequency. The frequency you transmit on is received by the repeater and "repeated" on a different frequency to your receiver. Consult a repeater directory or some online websites for the desired repeaters in your area.
| Offset. This refers to a programmed frequency that
transmits on other than the receive frequency. Typically the offset on 2
meters is either +600 khz or -600 khz. For 70 cm the offset can be 5 mhz
high or low or in some cases 1 mhz high or low.
An example would be a 146.82- repeater. You would receive on 146.82 mhz and you would transmit 600 khz down on 146.22 mhz. A repeater on 147.30+ means you would receive on 147.30 mhz and you would transmit 600 khz up on 147.90 mhz. In most radios (and this radio in VFO mode) you don't need to know the exact transmit frequency. You just program the + or - offset and the correct transmit frequency will be programmed in. In the Baofeng you program the receive frequency in the desired channel and then you program the transmit frequency right over the receive frequency channel. More on this later. |
The offset mode "Menu" "2" "5" and the offset frequency, "Menu" "2" "6" are only valid in the Frequency Mode, not Channel Mode.
You can also set the power output to either 1 watt or 5 watts. There are a few other options but are not important for basic operation.
You can either program the UV-5R from the keypad or use the CHIRP programming software available from the web as a free download, and a special USB programming cable. The software is easy to use but it is not for the faint of heart. One caveat is making sure the correct driver for your USB to serial cable adapter is installed and set up. See this page to learn how. You must have some knowledge as to what you are doing otherwise you could damage your UV-5R. I recommend you learning to manually program using the keypad because there will be a time you will be in the field somewhere and need to set the radio on a new repeater or new frequency and you won't have access to the programming software and special cable.
Programming from the keypad can be done but it is somewhat complicated and if not followed properly it will fail to program correctly. This author still recommends you learn to program manually. Soon you will be able to program the UV-5R without having to use instructions. The problem lies when you have another make or model transceiver and you have to learn to program it too. No two models are alike in programming.
Before programming from the keypad remember you cannot program a channel over a channel that has already been programmed. You must delete (clear) the data on the desired channel first. Then you can program that channel. Also remember you must use the upper display (A) to program a channel into memory. You must also be in the VFO or Frequency Mode. Before programming desired channel into memory you must set the CTCSS (if needed) and the power level. In most instances you do not need to set the CTCSS receive unless there is unwanted interference on that frequency. Also if someone wanted to contact you direct and they didn't have their CTCSS encode on and on the correct frequency you will not hear them.
The following is an example of how to program 146.52 simplex in channel 3 in your Baofeng UV-R:
| Turn radio on. You should see a "Welcome"
display. You may also hear a voice telling you that you are in either
"frequency mode" or "channel mode". If voice says
"frequency mode" press orange VFO/MR on front top of radio so
it says "channel mode". In "Channel" mode press the
arrow up/down to see if your display skips over Channel 3. If it skips
over, it is empty and can be programmed. If it stops on channel 3 then
it is already programmed and must be erased. To erase, press the
"Menu" then quickly press "2" and "8". (If
in any of these steps you don't press anything the radio in about 8
seconds will reset back to normal operation.) You should see
"DEL-CH". Press "Menu" then 3 then "Menu"
again. You should hear the voice saying "Confirmed". Channel 3
is now empty and is ready to be programmed for 146.520.
Press orange VFO/MR button once. You should hear "Frequency mode". Press the blue A/B button so the little arrow just left of the frequency is pointing up designating top display. Press "146520" You should hear and see 146520. There should be no icons above the top frequency display. If so you must clear them. See Quick Reference box below. To set or confirm power level press "Menu" then "2". You will see either HIGH or LOW. If it is opposite of what you want, press "Menu" then "arrow up" to toggle power level. Then press "Menu" again and you should hear "Confirmed". Now to program 146.520 into memory. Press "Menu" then "2" then "7". You should see "MEM-CH". Press "Menu" you should hear "Memory channel" press "Menu" again. You should hear "Receive memory". Your channel 3 should now be programmed. To verify, press the orange VFO/MR button then press the "arrow up" or "arrow down" to see if the display stops on channel 3 and you should see 146.520 displayed. If so your channel 3 is programmed properly. Do this sequence to program all simplex frequencies. |
Using a repeater remember you have to program the repeater transmit frequency as your receive frequency first on the desired channel and then a different transmit frequency in your transceiver for the repeater receiver input channel. For repeater use it becomes a bit more complicated because you have to program the receive frequency in your transceiver first, then on the same channel you have to program the transmit frequency (Don't worry, it won't overwrite the receive frequency). This might sound confusing but it works. Note that you don't need to program any offset or +/- as in the VFO settings when programming a repeater in the Channel Mode.
Example: You want to program a repeater, 147.300 on channel 5 with a CTCSS transmit tone of 146.2 HZ. Remember the 147.300 repeater has a 147.900 input which is a (+) offset. Note: Offset settings are only for Frequency Mode.
|
First make sure channel 5 is empty. Next enable the CTCSS tone and set it to the correct frequency. Press "Menu" then "1" and "3". You should see T-CTCS and either "Off" or a number displayed. Press "Menu" then arrow up till you see 146.2 then press "Menu" again. You will hear "Confirmed". Your radio will now send the 146.2 tone when transmitting. Next, while in "frequency mode" press 147300. This will set the receive frequency. Now follow closely!!! While you are in "frequency mode" press "Menu" then "2" and "7". Then "Menu" again. You should hear "Memory channel". Push 0 and 5. Display will show CH-005. Now push "Menu". You should hear "Receiving memory". Hit "Exit" or wait a few seconds and the display reverts back to 147.300. Press 147900 (which is the repeater input frequency). Then press "Menu" then "2" and "7" and "Menu" again. You should hear "Transmitting memory". Your radio is now programmed for this repeater on Channel 5. To verify, press the orange "VFO/MR" button and arrow up to channel 5. You should see a +- together on display. This means the repeater offset is programmed in and you should now be able to work the repeater. You can prove this by transmitting and seeing the display change from 147.300 to 147.900. If this does not happen then erase the channel and try again. Remember that the CTCSS tone and high or low power is set as a default so the next channel you program will use the same configuration unless you change them. Remember, if in frequency mode the offset and CTCSS work manually and you can change at will without affecting the memory channels programmed. |
If you are in the VFO (Frequency Mode) and wish to use a repeater you must change the offset setting and verify the CTCSS frequency. So set the offset to (+) by pressing "Menu" "2" and "5". You should see SFT-D (Off). Press "Menu" then arrow up till you see a (+) in the lower right. Press "Menu" and you should see a little (+) at the very top of display. If the repeater input is low you will need to set the shift to (-) Now you have to set the offset frequency which in the VHF band is 600 KHZ. Press "Menu" then "2" and "6" and you should see "OFFSET". Press "Menu" then "000600" then "Menu" again. While in frequency mode you should see the display change to 147.900 when you press the transmit button. Your transceiver (in frequency mode) will now be able to work the repeater.
There are a lot of other settings that can be configured but for most operations the above is all you need to know. Some options is to turn off the beeps and voice and the display from coming on when you receive or transmit. These are your options. Be aware that there is a master reset and it will erase all memories and turn the language into Chinese. So be careful and never reset the radio which is "Menu" then "4" "0" unless you really need to.
Some other features are channel scanning and listening to Broadcast FM stations among others. Consult your operation manual for all other options.
|
Quick reference Delete a channel - (in freq mode) "Menu" "2" "8" "Menu" "6" "Menu" will clear channel 6. Turn CTCSS transmit off - "Menu" "1" "3" "Menu" [arrow down to display off] then Menu. Turn offset off - "Menu" "2" "5" "Menu" [arrow down to display off] then "Menu". If you can't punch in and display the desired frequency you will want to change the STEP in Menu 1. Tighten squelch "Menu" "0" "Menu" [arrow up two units or so] then "Menu". Remember, the Offset "Menu" "2" "6" and Shift "Menu" "2" "5" are only for the Frequency/VFO mode and not for programming the channels. If you accidentally or deliberately reset the transceiver it will come up in the Chinese language. You need to hit "Menu" "1" "4" "Menu", and hit the up or down arrow to select English or None, then hit "Menu" again. |
Some suggestions: When programming channels, group them together by services. As a suggestion, make channels 0 through 50 as amateur radio frequencies. Make channels 100 through 128 public service police and fire monitoring.
Once familiar with unit and everything is programmed in that you want, you can turn off the beeps and voice acknowledgements. I find the backlight display annoying and I shut them off too. You can save battery life by changing the "Save" option, Menu 3, from "Off" to 1,2,3, or 4. 4 being the longest save. This option puts the receiver to sleep for a moment. You may notice the loss of a syllable or so with longer sleep times.
The "Time out timer" TOT is a feature that will stop your transceiver from transmitting after a period of time. This will prevent a short in a remote microphone cable from transmitting erroneously thus causing interference. It's default is 60 seconds. You can change it to longer times with "Menu" 9.
There are a number of ways to adapt the transceiver to a better or external antenna.
If hooking transceiver to an external antenna, use a "pigtail" adapter to take the "reverse SMA" jack on radio back to a BNC jack or SO-239 jack. It is not recommended to use an SO-239 adapter on the transceiver. If connecting a stiff cable or dropping can break the connector off inside the radio and it is almost impossible to repair.
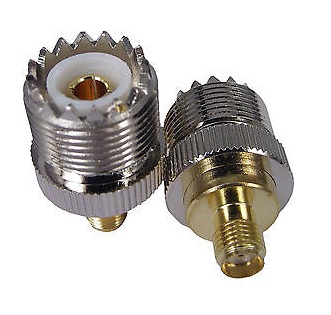
Use these with extreme caution. A heavy thick cable can place a strain on the
internal connector and break it off inside the transceiver. Instead use the
pigtail below.
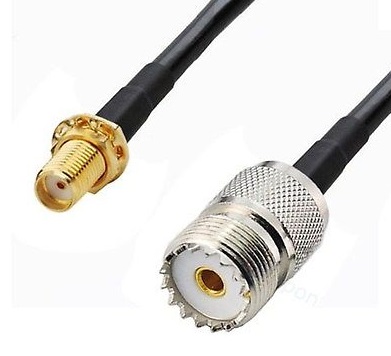
Use this pigtail adapter to hook your radio up to an external antenna cable. The
pigtail can be about six inches long or three feet long. These are available on
Ebay.
Another way to get better portable coverage is to replace the antenna with a full quarter wave whip antenna. It may be longer but coverage is almost doubled. It can be ordered here. Another place is eBay. In the eBay search input type in "Nagoya NA-771 SMA-Female" You will find many auctions at prices at around US$3.95 free shipping.
You can more than double your usable coverage by adding a ground tail, which in actuality is a completion of a dipole type antenna. Information can be seen here. You may need to adapt the antenna connector to a BNC for ease of adding a ground tail.
The above connector can be purchased on Ebay for less than US$4.00. This will allow you to attach a ground pigtail and more standard antennas and cables.
Why do I have two power levels? 1 watt and 5 watts? According to the F.C.C. rules you should only use enough power to achieve usable communications. Also high power will reduce your battery life. If you are communicating with another user and they are very close, like in the same building or proximity, try to use low power. It will create less interference with others on the same frequency in other areas. If using a repeater and are in close proximity of it, use low power and a longer antenna which will extend your battery life and talk time.
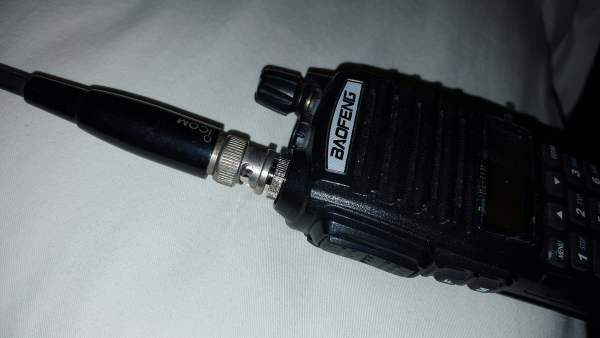
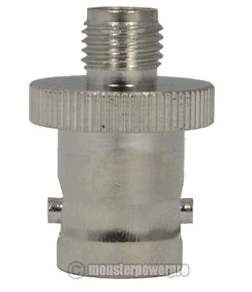
Many times you will want to easily swap your antenna to a better one or easily connect to an outside house or mobile antenna. The Baofeng and similar radios use a "Reverse SMA" type connector shown below which is non-standard as shown below.

You can purchase an adapter on Ebay for less than US$4.00 to remedy this as shown below:
You can remove original antenna and screw in this adapter and you will have a standard connector as shown below:
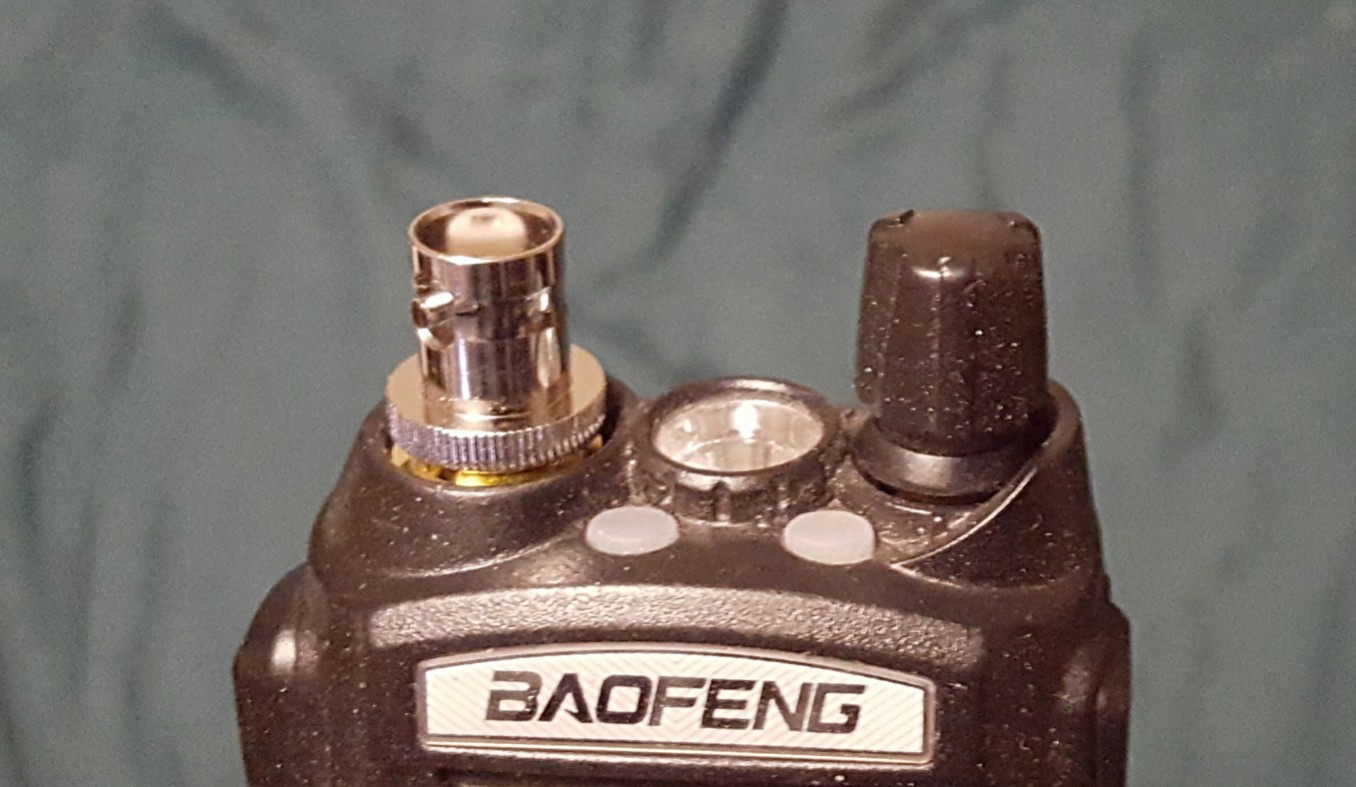
Using the BNC connector allows you to use standard antennas and cables to "quick connect" to radio without having to screw and unscrew the cable or antenna. You might want to put a dab of glue under the knurled flange to keep the adapter from accidentally unthreading. It can still be broken loose should you want to remove the adapter. DO NOT put any glue on the actual threads or you will never get it off without damaging the radio. I would recommend a water soluble glue like Elmer's Glue All which is much less permanent. When screwing on adapter DO NOT OVERTIGHTEN!! This may strip the brass threads on the radio connector or break the connector off the circuitboard and permanently damage the radio.
Other advantages of converting to BNC is that you can insert a wattmeter/SWR meter inline, directional antennas for direction finding (fox hunting), and a better pigtail ground for more portable gain explained in this article.
.....more suggestions to follow.....